
Introduction
Say what you want about infamous Godus, but it does have a rather nice visual style, and what I especially liked about it — that stylized terraced terrain.
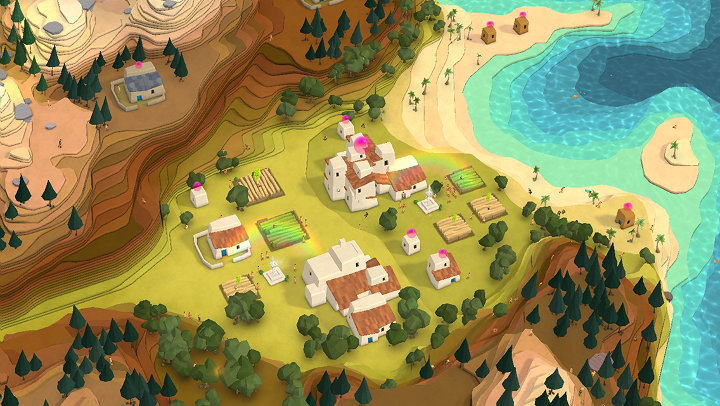
I managed to somewhat replicate this look and even took it a step further, implementing it on a spherical planet.
Since then, many people have been asking about its implementation details. Here is how I did it.
High-Level Overview
The main idea behind such terraced terrain: it is just another representation of a heightmap. Heightmaps are probably the easiest and most popular way to generate terrains, so if you’re already using them, then you most likely won’t need to change anything except mesh generation code.
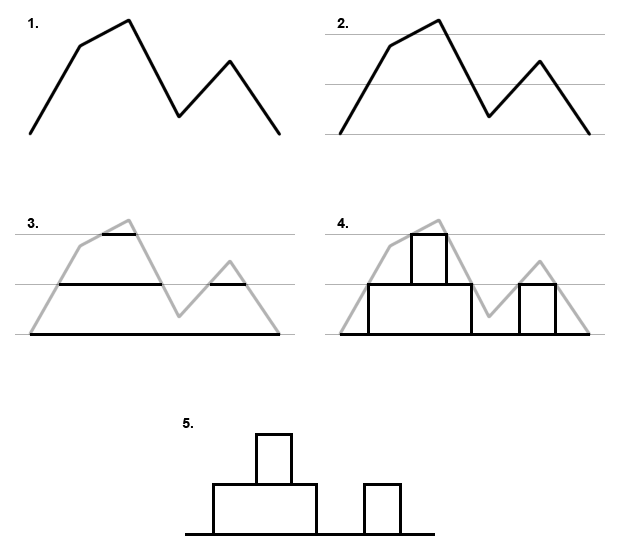
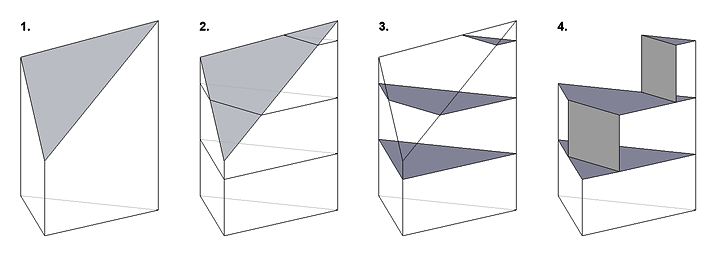
The high-level algorithm is as follows:
- Take heightmap-based surface.
- Cut it into slices with horizontal planes.
- Fill intersections between the planes and the heightmap.
- Connect planes with vertical walls.
- PROFIT!
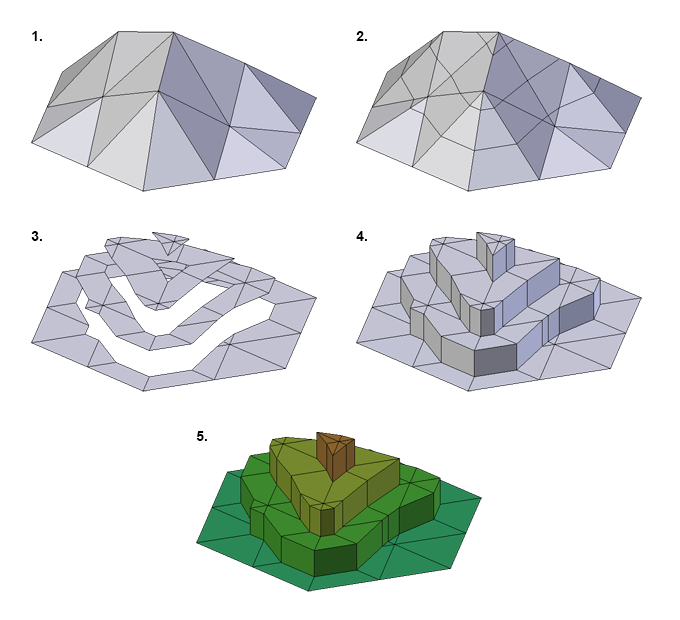
Or in three dimensions:
And here is a top-down view:
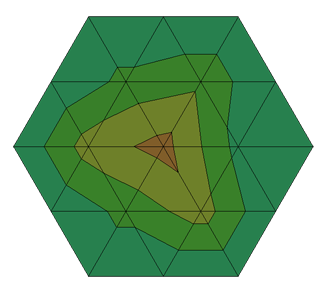
Notice how the mesh still in some way preserves those triangles of the heightmap. What exactly happens here is that each triangle of a heightmap surface is replaced with a fragment of terraced terrain that consist of one or more “steps”. The algorithm for converting a triangle to such steps will be as follows:
- Iterate through all triangles made by heightmap data.
- For each triangle, find all planes that are crossed by this triangle, plus one more plane below. This can be done by taking this triangle’s points with minimum and maximum heights and finding all planes whose heights are between those min/max values.
- For each plane that we’ve just found, add polygons to the mesh using meandering triangles algorithm (which is similar to more widely known marching squares algorithm, except it works with triangles, not squares); based on which points of the triangle are above or below the plane.
There can be three fundamentally different cases of polygon configuration: when one, two or all three points of the triangle are above the plane (the picture below shows each one of them).
- Additionally, for each plane excluding the bottom one, add a “wall” polygon connecting this plane with the plane below.
Pseudocode Example
This is a slightly simplified pseudocode implementation of the entire algorithm. It doesn’t deal with generation of polygon normals (which is quite straightforward) and assumes a flat terrain, rather than a sphere.
// This will store total number of the generated vertices, this is needed
// to generate vertex indices for mesh polygons
iv = 0
for each triangle in mesh data:
// 3D vector coordinates of each point of the triangle
v1, v2, v3
// Each point's heights above "sea level". For a flat (non-spherical)
// terrain it's just the vertical component of the respective vector
// ("y" in case of Unity engine).
h1 = v1.y
h2 = v2.y
h3 = v3.y
// Min and max heights of the planes that cross the triangle (plus one
// plane below). Here we assume that planes are located at discrete
// heights, 1 unit apart from each other.
h_min = floor(min(h1, h2, h3))
h_max = floor(max(h1, h2, h3))
// Iterate through each plane
for (h = h_min; h <= h_max; h++):
// This variable indicates, which case of the Meandering Triangles
// algorithm we're dealing with: one, two or three points of the
// triangle above the plane
points_above = 0
// Check for all 8 possible combinations of point locations relative
// to the plane, and narrow them down to three different mesh
// configurations.
// Note that in some cases we're swapping values so that points above
// the plane would always be in the same variables, this simplifies
// the actual generation of mesh polygons.
// (This code may probably be further optimized for better readability
// and/or performance, but here is one of the ways to do it.)
if (h1 < h):
if (h2 < h):
if (h3 < h):
// All points are below the plane, no triangles will be
// added to the mesh (should not be possible)
else:
points_above = 1 // v3 is above
// no need to swap values, they're already fine
else:
if (h3 < h):
points_above = 1 // v2 is above
v1, v2, v3 = v3, v1, v2 // make it v3 instead
else:
points_above = 2 // v2 and v3 are above
v1, v2, v3 = v2, v3, v1 // make them v1 and v2 instead
else:
if (h2 < h):
if (h3 < h):
points_above = 1 // v1 is above
v1, v2, v3 = v2, v3, v1 // make it v3 instead
else:
points_above = 2 // v1 and v3 are above
v1, v2, v3 = v3, v1, v2 // make them v1 and v2 instead
else:
if (h3 < h):
points_above = 2 // v1 and v2 are above
// no need to swap values, they're already fine
else:
points_above = 3 // all vectors are above
// Since we've swapped values of the points, let's find their heights again
h1 = v1.y
h2 = v2.y
h3 = v3.y
// For each point of the triangle, we will also need its projections
// to the current plane and the plane below. Just set its vertical
// component to the plane's height
// Current plane:
v1_c = vector3(v1.x, h, v1.z)
v2_c = vector3(v2.x, h, v2.z)
v3_c = vector3(v3.x, h, v3.z)
// The plane below; these vertices will be used to make vertical "walls"
// between planes
v1_b = vector3(v1.x, h - 1, v1.z)
v2_b = vector3(v2.x, h - 1, v2.z)
v3_b = vector3(v3.x, h - 1, v3.z)
// Now we generate mesh polygons for each of the three cases
if points_above == 3:
// The simplest case, just one triangle
add_mesh_vertex(v1_c)
add_mesh_vertex(v2_c)
add_mesh_vertex(v3_c)
add_mesh_triangle(iv, iv + 1, iv + 2)
iv += 3
else:
// Here we need to find locations of new points that are located on
// the sides of the triangle's projections.
// (See images below for a visual explanation.)
// We do that by interpolating between vectors based on their heights.
t1 = (h1 - h) / (h1 - h3) // Interpolation value for v1 and v3
v1_c_n = vector3.lerp(v1_c, v3_c, t1)
v1_b_n = vector3.lerp(v1_b, v3_b, t1)
t2 = (h2 - h) / (h2 - h3) // Interpolation value for v2 and v3
v2_c_n = vector3.lerp(v2_c, v3_c, t2)
v2_b_n = vector3.lerp(v2_b, v3_b, t2)
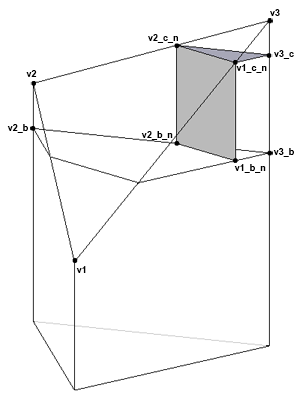
if points_above == 2:
// Add "roof" part of the step
add_mesh_vertex(v1_c)
add_mesh_vertex(v2_c)
add_mesh_vertex(v2_c_n)
add_mesh_vertex(v1_c_n)
add_mesh_triangle(iv, iv + 1, iv + 2)
add_mesh_triangle(iv + 2, iv + 3, iv)
iv += 4
// Add "wall" part of the step
add_mesh_vertex(v1_c_n)
add_mesh_vertex(v2_c_n)
add_mesh_vertex(v2_b_n)
add_mesh_vertex(v1_b_n)
add_mesh_triangle(iv, iv + 1, iv + 2)
add_mesh_triangle(iv, iv + 2, iv + 3)
iv += 4
else if points_above == 1:
// Add "roof" part of the step
add_mesh_vertex(v3_c)
add_mesh_vertex(v1_c_n)
add_mesh_vertex(v2_c_n)
add_mesh_triangle(iv, iv + 1, iv + 2)
iv += 3
// Add "wall" part of the step
add_mesh_vertex(v2_c_n)
add_mesh_vertex(v1_c_n)
add_mesh_vertex(v1_b_n)
add_mesh_vertex(v2_b_n)
add_mesh_triangle(iv, iv + 1, iv + 3)
add_mesh_triangle(iv + 1, iv + 2, iv + 3)
iv += 4
 |
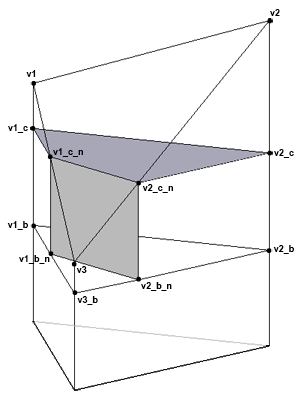 |
| points_above == 1 |
points_above == 2 |
Conclusion
I hope this will help anyone who wants to implement such terraced terrain. There is a lot more you can do with that, like different ways to apply colors to layers, adding baked ambient occlusion, or maybe even using some textures, it’s all up to you.
For anyone who just wants to play around with such terrain without writing any code, you can have a look at Planet Painter, my free tool for editing spherical terrains, which supports both classic heightmaps and terraced terrain. You can even export the planets as 3D models and use in your Unity or other projects.
And of course feel free to ask me if you still have any questions, either here in comments, via email (icospheric@gmail.com) or Twitter (@icospheric).